
Triggering a campaign
How to start an Outbound Calls or Text Messages campaign — where the trigger address lives, what to send, and how to wire it to a CRM or a form.
Outbound Calls and Text Messages campaigns wait to be told who to contact. Each one has its own address; send a lead's details there and the campaign acts on it immediately.
Finding the trigger address
Open the campaign and look for the Trigger this campaign panel. It's expanded by default on Outbound Calls and Text Messages campaigns, because for those it's the only way to start anything.
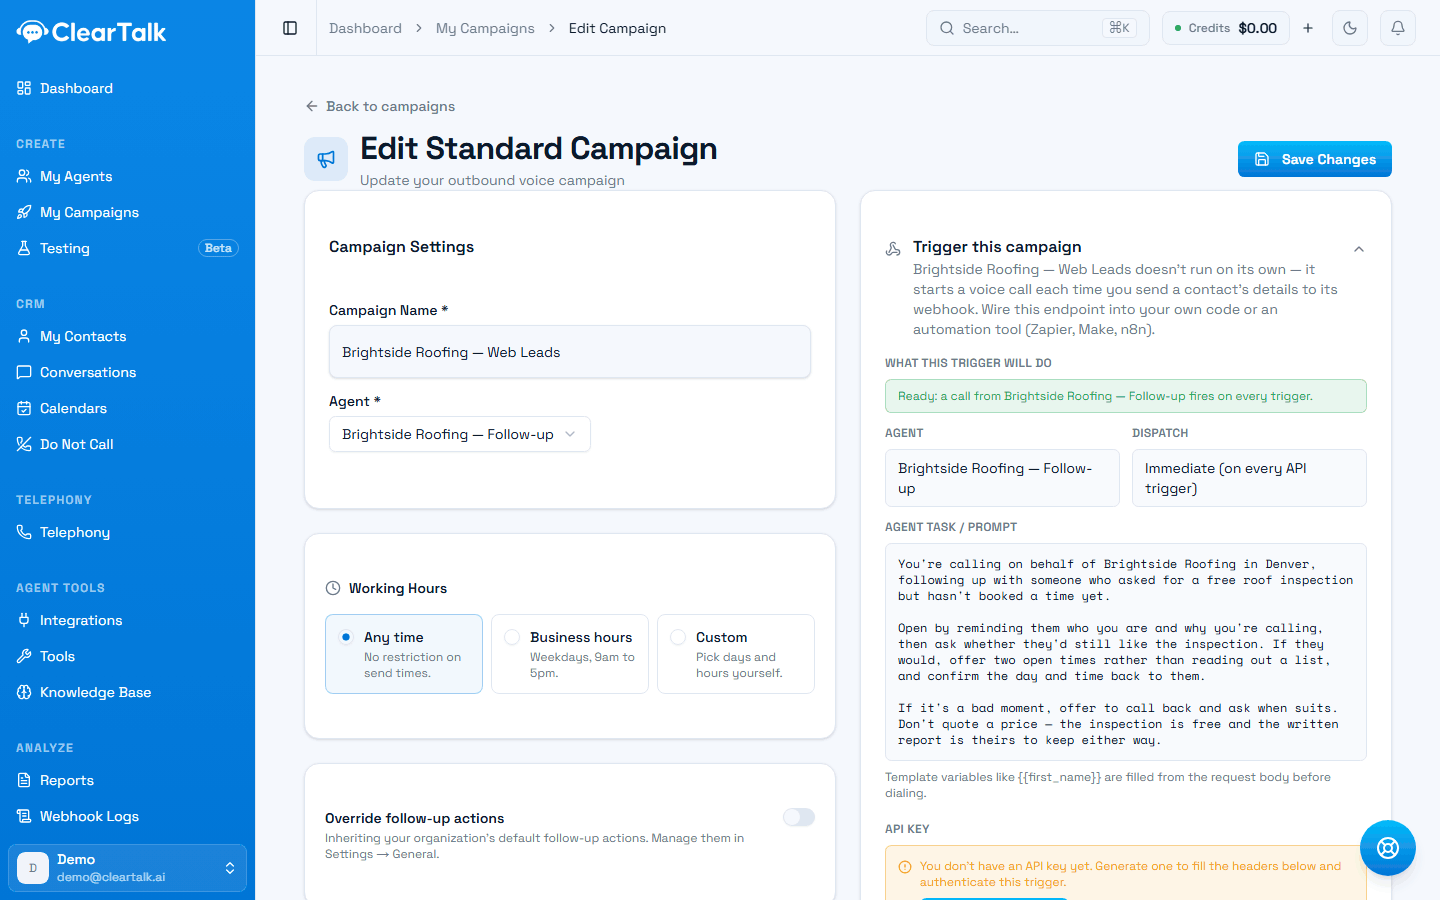
- 1In plain words: nothing happens until you send it a lead.
- 2The readiness check — green means a lead sent now would actually produce a call.
- 3What the agent will say. Worth reading before you connect a real source to this.
Before the address, the panel shows a readiness check — the agent that will pick it up, and what it will say or send. If either is missing you'll see a warning here rather than discovering it when your first real lead fails.
Check the readiness box before you wire anything up. A campaign with no agent assigned, or a texting campaign with no greeting message, will reject every lead you send it. The panel tells you this before your CRM does.
Scroll down in the same panel and you get the request itself — the address, the headers, the body, and a ready-made command:
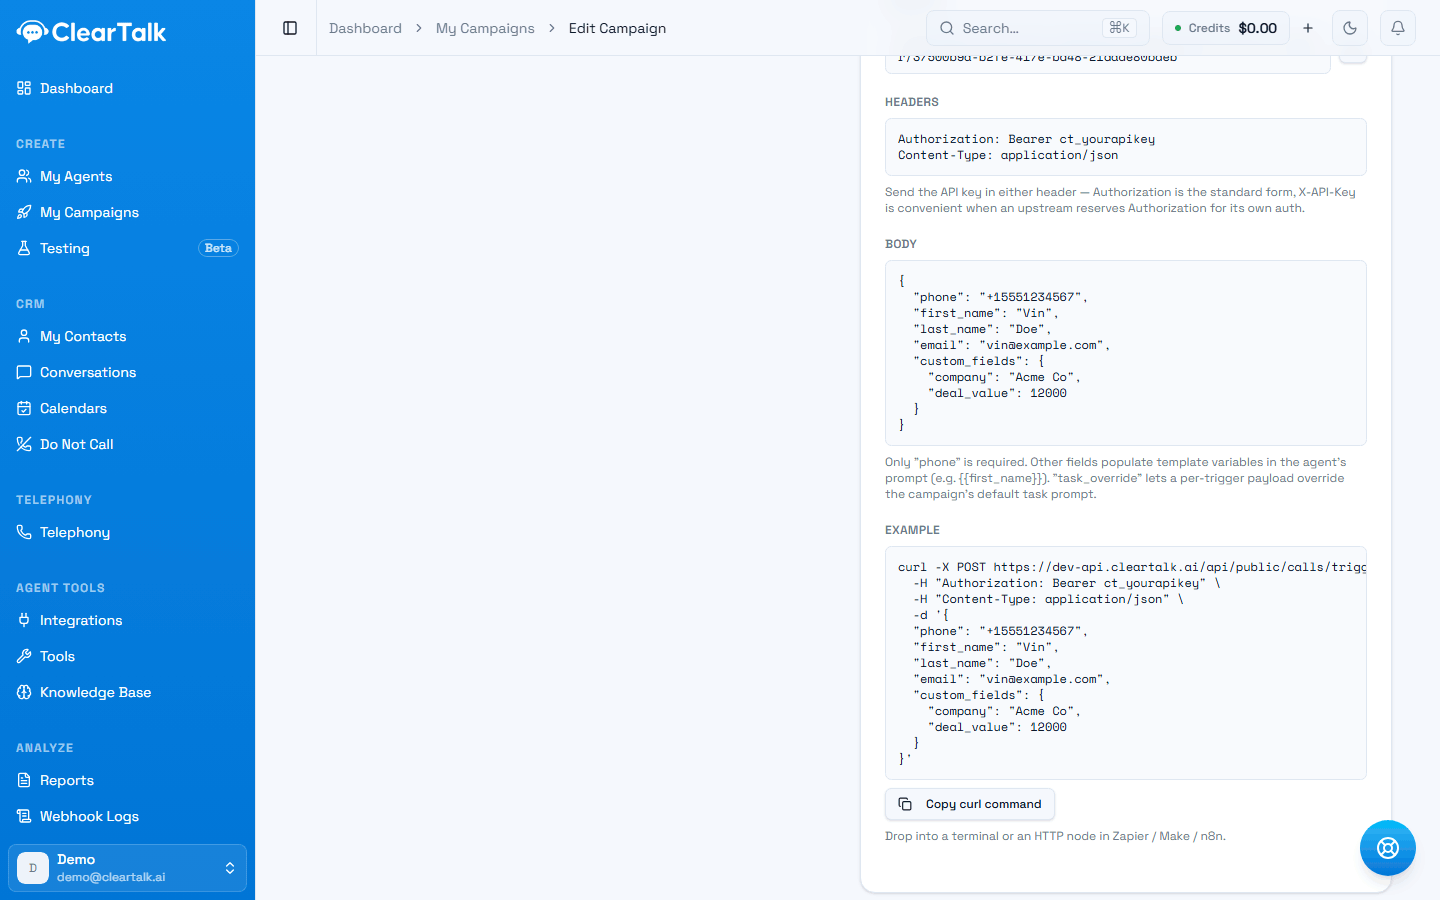
- 1Your API key goes here. Either header works.
- 2Only “phone” is required — the rest is context for the agent.
- 3Copy this straight into a terminal, or into an HTTP step in Zapier, Make, or n8n.
Getting an API key
The trigger address needs an API key to prove the request is yours. If you don't have one, the panel offers to generate it — give it a name that says where it'll be used ("GoHighLevel workflow", "Website form").
The key is shown exactly once
Copy it when it appears and store it wherever you keep credentials. There's no way to see it again — if you lose it, generate a new one. Existing keys are shown masked so you can recognise them, not reuse them.
Keys are managed under Integrations → API access.
What to send
At minimum, a phone number. Everything else is optional, and everything else makes the conversation better.
{
  "phone": "+15551234567",
  "first_name": "Vin",
  "last_name": "Doe",
  "email": "vin@example.com",
  "custom_fields": {
    "company": "Acme Co",
    "deal_value": 12000
  }
}
custom_fields is the interesting one. Anything you put there is available to the agent during the conversation, so the agent can open with something specific rather than generic:
Worth sending
- What they enquired about — “roof repair”, “new patient”.
- Where they came from — which form, which ad, which list.
- Anything that changes what the agent should say.
- Their appointment time, for a reminder campaign.
Not worth sending
- Your internal record IDs, unless a tool will use them.
- Everything in the CRM record “just in case”.
- Anything you wouldn't want read aloud by mistake.
You can override the message for one lead
Both channels accept an override field — a one-off task for a call, or a one-off message for a text — that replaces the campaign's default for that lead only. Useful for a genuinely different message to a specific person, without a second campaign.
Using what you sent
Everything in the payload becomes a variable you can drop into the agent's instructions, a pathway step, or a text message, by writing its name in double braces.
Instructions: You're calling
{{first_name}}about their enquiry for{{service}}at{{property_address}}. Confirm the address is right before booking anything.
Nothing needs mapping or configuring first. Post the field, use its name.
What's always available
These come from the contact record itself, whether or not you send them in custom_fields:
| Variable | From |
|---|---|
{{phone}} | The number you posted |
{{first_name}} · {{firstName}} | first_name |
{{last_name}} · {{lastName}} | last_name |
{{full_name}} · {{fullName}} | Built by joining the two — you never send this |
{{email}} | email |
Your own fields, in either casing
Every key in custom_fields is offered both ways round, so you don't have to match how your CRM happens to spell things:
| You send | You can write |
|---|---|
"property_address" | {{property_address}} or {{propertyAddress}} |
"propertyAddress" | either, again |
"Property Address" | either, again |
Contact fields win a name clash
If a custom_fields key resolves to the same name as a standard one — sending first_name inside custom_fields, say — the value from the contact record wins. Give a custom field its own name rather than trying to override a standard one.
What happens to a name that doesn't exist
Deliberately different by channel, because the consequences are:
- On a call, or in a pathway step, an unmatched
{{first_naem}}is left in the text exactly as written. You'll see it in the transcript and know immediately you have a typo. - In a text message to a lead, it's removed and the sentence tidied up. Raw
{{ }}arriving on someone's phone reads as broken software, so it never ships — but the gap is recorded, so check your sends after changing a template.
Test with one real lead before wiring the workflow to everything. A misspelled variable is invisible in the campaign editor and obvious in the first transcript.
Wiring it up
From a CRM
Most CRMs have a workflow step that sends a web request. Point it at the trigger address, add the key, and map the CRM's contact fields onto the ones above.
GoHighLevel has a full walkthrough with screenshots. The same shape works for any CRM that can send a web request.
From a website form
Most form builders can send a submission to a web address. The mapping is usually direct — phone to phone, name to first_name, and whatever the form asked about into custom_fields.
From your own software
It's an ordinary HTTP request. The panel gives you a working command you can paste into a terminal to test with — see Developers if you're building something more involved.
Test it before you connect it
- 1
Send yourself one
Use the example from the panel with your own phone number. Confirm you get the call or text.
- 2
Check what the agent knew
Open the conversation and confirm the name and custom fields came through — not just that it fired.
- 3
Send one outside working hours
A text waits for the next open slot; a call goes straight out. Confirm which one you're getting before a real lead does.
- 4
Then connect the real source
And watch the first few live leads before walking away.
Common problems
| Symptom | Cause |
|---|---|
| Nothing happens at all | The campaign has no agent assigned, or the key is wrong |
| Texts rejected but calls work | The texting campaign has no greeting message |
| Fires, but the agent doesn't know the name | Field names in your source don't match — check the mapping |
| Fires at the wrong time of day | Calling hours are in your time zone, not the contact's — see whose clock the window is read in |
| Duplicate calls to one person | Your CRM workflow is running more than once — dedupe on that side |
Map from a real payload, not from a test
If your CRM offers a "test" that sends sample data, its field names may not match what a live record actually sends. Trigger one real record, look at what actually arrived, then build the mapping from that.